Chutney Mania
Chutney Mania
Chutney or simply sauce are best of friends for any starter, they add an extra flavour to your dish and make them even tastier. World over they are known as a sauce but in India, it is fondly called Chutney. There are many varieties of chutney available in India from North to South or East to west, Fruit, Dry fruit, Coriander, Garlic, Tomato, Red Chilli and the list can go on and on. Chutney on someone's plate needs no introduction, it is generally inviting with its colour and taste.
Coriander/Cilantro is one of the most important ingredients for green chutney/Dip/Sauce. You can compliment it with Tomato. garlic and basil leaves. Today sharing few easy and simple Chutney recipes namely Coriander, Green Mayo and Tamarind you can also call them as Dip or Sauce. This recipe is basic and effortless for any kitchen.
You can serve this chutney with any starter such as fritters, Patti, Dhokla, Samosa and it is so versatile that it can complement any dish including simple Kichadi. One chutney may uses.
My Kitchen.. My Recipe.. My Way.
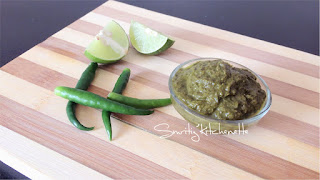
Fresh Green Coriander Chutney
- Preparation Time 5-10 mins
- Course All
Ingredients
- Fresh Coriander ( cilantro) 1 cup
- Green Chillies 2
- Garlic 3 - 4
- Ginger 1 inch
- Lemon Juice 1 tbs
- Salt to taste
Method
- Take a mixing jar to add fresh coriander, green chillies, ginger, garlic, salt and blend it well.
- Now add lemon juice and blend again.
- Add water if required.
Green Mayo Chutney (Dip)
- Preparation Time 5-7 mins
- Course All
Ingredients
- Fresh Green Chutney 3 tbs
- Plain Mayonnaise 3 tbs
- Mixed Herbs (opt) 1 tsp
- Salt a pinch
Method
- Mix all the ingredients in the green chutney and mix well.
- Your Green Mayo Chutney is ready to serve!!
Instant Kitchenette Tip
- Add 1 inch of capsicum for a crunchy flavour in your chutney.
- Add 2 inches of lemongrass while blending to get a fresh lemony flavour in your chutney.
- Add 1 tbsp of curd to get fresh green colour in your chutney.
- Instead of using water use ice cubes to the chutney while blending to balance the temperature, and it will prevent chutney from any discolouration.
- You can add chaat masala and cumin powder to enhance the flavour.
Cooked Coriander Chutney
- Preparation Time 5 mins
- Cooking Time 15 mins
- Course Breakfast/Main
Ingredients
- Fresh Coriander 3 cups or 3 bunches
- Green Chillis 3 - 4 (roughly chopped)
- Tamarind Pulp 1- 2 tbs
- Jaggery Powder 1/2 tsp
- Turmeric Powder 1/2 tsp
- Oil 1/2 tsp
- Salt 1/2 tsp
- Water as required
Method
- Now add chopped coriander, tamarind pulp, jaggery powder, salt and mix everything well and cover with a lid for 4 -5 mins.
- After 5 mins you will see the coriander is coked now turn off the flame and let it cool down properly.
- Now take mixing jar and blend everything to a smooth mixture,
- Do not add too much water while blending the chutney because it will lose water and turn watery.
- Your cooked coriander chutney is ready. You can store it in airtight containers for maximum 10 - 12 days, it will taste the same.
Instant Kitchennette Tip
- Coriander will turn darker when you will cook it so turmeric is an important ingredient to add.
Tamarind Chutney
Ingredients
- Tamarind pulp 1/2 cup (100gm)
- Jaggery Powder 1/2 cup
- Dates (opt) chopped 2 tbs
- Rasins (opt) 8 - 10
- Dry Ginger Powder 1 tsp
- Rock Salt to taste
- Salt to taste
- Dried Red Chillies 2
- Garam Masala 1/2 tsp
- Pachphoran For Tempering
- Oil 1 tbs
Method
- To make this chutney heat a pan add oil, once the oil is hot add tempering (pachphoran), add red chillies, chopped dates/raisins saute for 30 secs.
- Now add tamarind pulp, jaggery powder, salt and mix it well.
- Bring it to boil on medium to low flame, add dry ginger powder keep stirring in between.
- Add garam masala while it has thick consistency all over, give it a good mix and turn off the flame.
How To Store Chutney
- Store your chutney in an airtight container.
- Try to avoid metal containers to store your chutney.
- If you have made green chutney in large quantity, do not add salt in the chutney as it helps in oxidation faster. Always add salt right before serving.


Thanks for sharing 😊
ReplyDelete